As with all my technical documents, I like to preface the articles, that I don’t pretend to be a master in said topic, nor always do stuff the best way, these articles are here as a documentation of my exploration, and if you find this useful then awesome! If you see something you want to discuss please hit me up on twitter as I’m always up for a good chat!
With a new website build, I wanted to learn what traffic was like on my website, more importantly, my “Logs”, as these posts are a mix of short and long forms. I just wanted to see which of these posts were doing better or worse, but I didn’t want to go down the route of using a full-blown tracking service for multiple reasons:
- I don’t want to mess around with the cookies and privacy stuff of Google analytics
- I don’t want to pay for an analytics service, like Fathom or Netlify Analytics package
- Most of the analytic servicers are just way too complicated for just a page counter
- I wanted to get my geek on and make something.
I knew I’d need some data housing to store the page URLs and clicks, and I’ve recently started playing around with MongoDB’s hosted solution Atlas for some Data logging of my Air Quality Sensor ( a future log to come, keep an eye out ), and I was super impressed with it and I’ve also not really done much NoSQL before…so to me this seemed like a perfect excuse to play with it again. Heck even if it wasn’t the right tool for me, I love tinkering with something trying to see if I can mould it to fit my needs, for me the best kinds of problems to solve!
One of the newer features that MongoDB Atlas has is the Data API service this allows you to interact with the mongo database without having to install any extra packages, if you really wanted to you could just interact purely over Curl or WGET without even installing a package. Armed with this you should be able to do a fair bit of stuff in my opinion a lot quicker, and developing a proof of concept that bit easier!
I’m not going to talk about how to get up and running with MongoDB and their Atlas offering, many smarter and more succinct people have done this, but I want to focus more on the Data API side do the bits that are new to me and hopefully new to you too! With that being said you should be able to get up a running with the free account.
You’ll want to get a Database that we can use to store the website stats, for me I called this **website **as I plan to have more stats housed here in the future, and then I created a collection called views. Now that we have something to store our data in we can get to the fun part and actually start recording.
First, we need to get the URL endpoint that Data API offers so we can interact with our database, You can find this by going to your Atlas dashboard and then clicking on Data API.
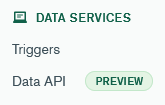
When the screen is loaded make sure you have Data API enabled for the Data source in question

The next step would be to go ahead and generate an API key by clicking the “Create API Key” button, make sure you take note of the key in your into your .env as ATLAS_DATA_KEY as it is only displayed to you the once, finally, copy the endpoint URL, into your .env something like ATLAS_DATA_URL
Now armed with everything that we need from MongoDB we can go ahead and create the functionality in our Next.js project.
Upserting a record.
So as we don’t want to have a new Document on each visit we want to make use of upserting documents, this will attempt to find the Document in question and update values but if it can’t find the document it will then go ahead and create the document with the values required. As well as upserting we also don’t want to have to read the document to get a count then increment the document then updating the with the new variable what we actually want to use here is one of Mongo’s super useful and highly powerful operators $inc this will allow us to say in the update call to go get the value of a Field and increment it by a value all in the same call as the update!
Start by creating a file that we can house the interactions, for me I created /lib/atlas.ts
First, let’s go grab our env variables and store them into a couple of constant variables
const dataUrl = process.env.ATLAS_DATA_URL;
const dataKey = process.env.ATLAS_DATA_KEY;
Next, create a function that we can call from a Next.js API Endpoint.
const upsertPageView = async (pageUrl: string) => {
	const response = await fetch(`${dataUrl}/action/updateOne`, {
		method: "POST",
		headers: {
			"Access-Control-Request-Headers": "*",
			"api-key": dataKey,
			"Content-Type": "application/json",
		},
		body: JSON.stringify({
			dataSource: "<NAME OF DATASOURCE>",
			database: "<NAME OF DATABASE>",
			collection: "<NAME OF COLLECTION>",
			filter: { name: pageUrl },
			update: {
				$inc: {
					views: 1,
				},
			},
			upsert: true,
		}),
	});
	return await response.json();
};
To explain this a little, we are first defining the URL we to send the request to using the constants variable dataUrl with the addition of /action/updateOne which is the endpoint we are after this is the endpoint we are POSTing too and the rest of the endpoints are defined here if you are interested (we’ll be using another one later on in the post).
The next bit is the headers we need to allow us to interact with MongoDB’s Data API standard stuff, with the addition of api-key which is using the API key that we stored earlier in the .env.
Onto the fun bit of the function and that’s actually the body of the request! We first make a JSON string stating our common bits like dataSource, database, and collection ( granted these could be made a bit DRYer, but I like to get stuff working then tidy up later!).
When doing updates to MongoDB we need to first tell MongoDB which document we want to update this is done by using the filter bit, we pass in an object on a key and value we want to use as a search so we want to find the document with a name of the passed in variable pageUrl for this post, we’ll use my last (b)log post /logs/work-in-progress (why not give it a read?).
The last two bits of the body are the really juicy bits, first, we need to define the fields of the document we are going to be updating in our case that’s views but as mentioned earlier we want to increment the number of views and not have to go fetch the document, read then update, so we can pass in a helper function that MongoDB provides and that’s the $inc operator this accepts another key-value object which can be multiple fields you’d like to update but in our case, we only need to do the one field, so we pass in the field views and how much we’d like to increment by which is 1 ( this could also be a negative number if you wanted to decrease). The final bit that allows us to do the real magic that is the "upsert": true this tells MongoDB that if you don’t find the record to update then insert it!.
To be able to access this helper function we want a new bit of middleware to /page/_middleware.ts this will allow us to send the page view increment on page load.
import { NextRequest, NextResponse } from 'next/server'
import { upsertPageView } from "../lib/atlas";


export functionmiddleware(req: NextRequest) {
  const { pathname } = req.nextUrl
  upsertPageView(pathname)
}
Now, this is nowhere near the perfect solution for this and will require more work before I suggest using it in production ( I’d love to see some solutions to the problems again hit me up on Twitter ), such as being able to rate limit it so that you don’t spam out page views to Atlas, only counting the visitor the once if visited the page in quick succession, and the last which is what we’ll cover a basic solution now and that’s to add a block list of pages/resources you don’t want to track.
Back in the /lib/atlas.ts file create a new function something like:
const isBlockedURL = (pathName: string) => {
	//Create an block list of urls that should not be tracked some examples are
	const blockList = [
		"/api",
		"/images",
		".jpg",
		".png",
		".svg",
		".ico",
		".css",
		".js",
		".json",
		".woff",
		".woff2",
		".ttf",
		".eot",
		".otf",
		".webmanifest",
	];

	return blockList.some((url) => pathName.includes(url));
};
Then back in the _middleware.tsfile change the code to be
import { NextRequest, NextResponse } from 'next/server'
import { upsertPageView, isBlockedURL } from "../lib/atlas";


export functionmiddleware(req: NextRequest) {
  const { pathname } = req.nextUrl
  if (!isBlockedURL(pathname) {
		upsertPageView(pathname)
	}
}
This will take the URL and check that it isn’t present in the list of endpoints we are not interested in and return if it should be blocked or not.
And with that you are recording the page views if you start viewing pages, you should start seeing entries in Atlas like the following.
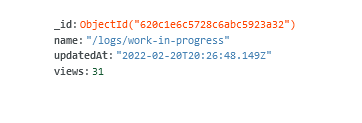
Mine will be slightly different as I have added an updatedAt attribute to mine, but for intents and purposes it should roughly look the same and you could call it finished depending on what you want to do with the data, however, let’s extend this further and read the data back into the website so we can show the page views that the (b)logs are getting.
Displaying the pages views
Displaying the page views is actually quite simple all we need to do is make use of a new call to Atlas that, is somewhat similar to the one to update the page counter, pair that with SWR we can pull the latest page views and display that next to a listing or on the page itself.
Back in /lib/atlas.ts let us create a new function that we can go and search for the page in question and return it if found.
const getPageViewCount = async (pageUrl: string ) => {
  const response = awaitfetch(`${dataUrl}/action/findOne`, {
    method: 'POST',
    headers: {
      'Access-Control-Request-Headers': '*',
      'api-key': dataKey,
      'Content-Type': 'application/json'
    },
    body: JSON.stringify({
      "dataSource": "<NAME OF DATASOURCE>",
      "database": "<NAME OF DATABASE>",
      "collection": "<NAME OF COLLECTION>",
      "filter": {
        "name":pageUrl
}
    })
  });
As you have seen this function is very similar to the upserting of the page, the difference being that we POST-ing to a new URL this time it’s /findOne and the body of the request is slightly different, as we don’t need to alter any data all we are interested in is finding the document that has the same name as what we have passed through.
The next step is to create an API endpoint in our local API folder that we can use with SWR that keeps calling this function so we can get a constant status of the pageviews, I created a route /api/pagesviews.ts which will house the code to call the function we created earlier and just output the results of that as its response.
import type { NextApiRequest, NextApiResponse } from "next";
import { getPageViewCount } from "../../lib/atlas";

export default async function handler(req: NextApiRequest, res: NextApiResponse) {
	// Get the query string parameter url.
	const { u } = req.query;

	// If no url provided, return an 0
	if (!u) {
		res.status(200).json({
			pageviews: 0,
		});
	}

	// Otherwise, return the number of pageviews for the provided url
	// call  getPageViewCount(url)
	const pageviews = await getPageViewCount(u.toString());
	res.status(200).json({
		views: pageviews,
	});
}
The snippets shows that we are passing the URL via a query string, we could do this by looking at the body among a few other different techniques, but ultimately what we need to do in the API endpoint is get the URL in question and pass that through as a parameter to the function we created earlier.
Having created the API handler we can get on to the last and arguably the most fun bit of this post and that is being able to display the page views in a component that can be used in multiple areas of the website.
In your components directory, you want to create a new component called PageViews /components/PageViews.tsx and in this we want to use SWR to go off to our internal API call and fetch the pages we’re interested in, so the following code should sort us on this:
import useSWR from "swr";
import { useRouter } from "next/router";
const fetcher = (url: string) => fetch(url).then((r) => r.json());

const PageViews = ({ url, className }: { url?: string; className?: string }) => {
	const router = useRouter();

	// if url is not provided, use the current url
	const queryUrl = url || router.query.url;
	const { data } = useSWR(`/api/pageviews?u=${queryUrl}`, fetcher);

	return <span className={className}>{data?.views || 0}</span>;
};

export default PageViews;
Picking the above code apart we are using next/router to get the current URL just in case we don’t pass anything through in the props, this is nice as it means if we wanted to display the page views of the page we are currently well we don’t have to pass anything through to the component as it can automatically pick it up. Then the next bit is using SWR to go off and get our current page view counter, then lastly we return that as <span> passing through the className attribute from the calling of the component so that we can add styles however we like.
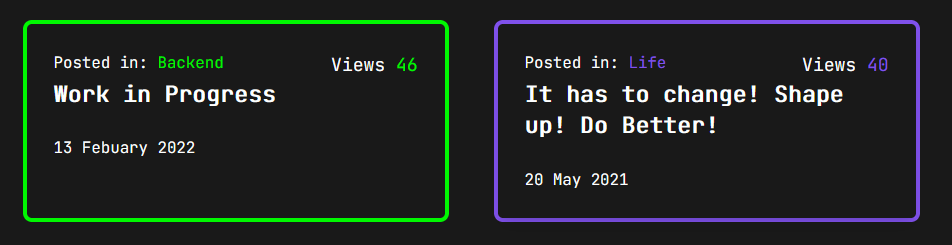
Finally, if we want to display this we only have to call the component the area we want to display the counter, for me I wanted to display it on the (b)log listing screen:
<div>Views <PageViews url={`/logs/${log.slug.current}`} className={`${categoryTextColor}`}/></div>Resulting in the following output (notice the Views section) or alternatively look at the top of the post 😀
And there we have it! We’ve used MongoDB, SWR and Next.js to create a tiny little analytical counter that isn’t bloated, it is anonymous and end of the day it is a fun exercise in how to achieve a basic insight into your website. Now I’ve already mentioned that it is code that I’ve thrown together as a learning exercise and there could tons of extra wins that can be made and there may even be a few security improvements to be made, so why not take what I’ve shown today and build upon it and share it with me, I’d love to see where people take this!
But thanks for sticking around and reading what is my first tutorial post, please drop me a message and Twitter if you have any questions, and until next time av’a good’en! 👋